Routing Rules
Routing Rules decide which channels get notified for which alerts. They govern every alert notification — both individual alerts and correlated alert groups. Each rule matches alerts by their labels; the first matching rule wins and sends those alerts to its destination channels. Whether the matched alerts notify one-by-one or fold into a single Alert Group is decided by the rule’s group-by keys.
Routing Rules replace the older Notification Policies flow. If you previously routed by tags, your existing policies were migrated to routing rules during upgrade — the matching logic now keys off labels instead of free-form tags.
Where to find them
Section titled “Where to find them”Open Alerts → Routing rules in the left navigation. Rules are evaluated in priority order (lowest number wins). The first rule an alert matches decides which channels notify and how often — and, through its group-by keys, whether the alert notifies on its own or correlates with others into one Alert Group.
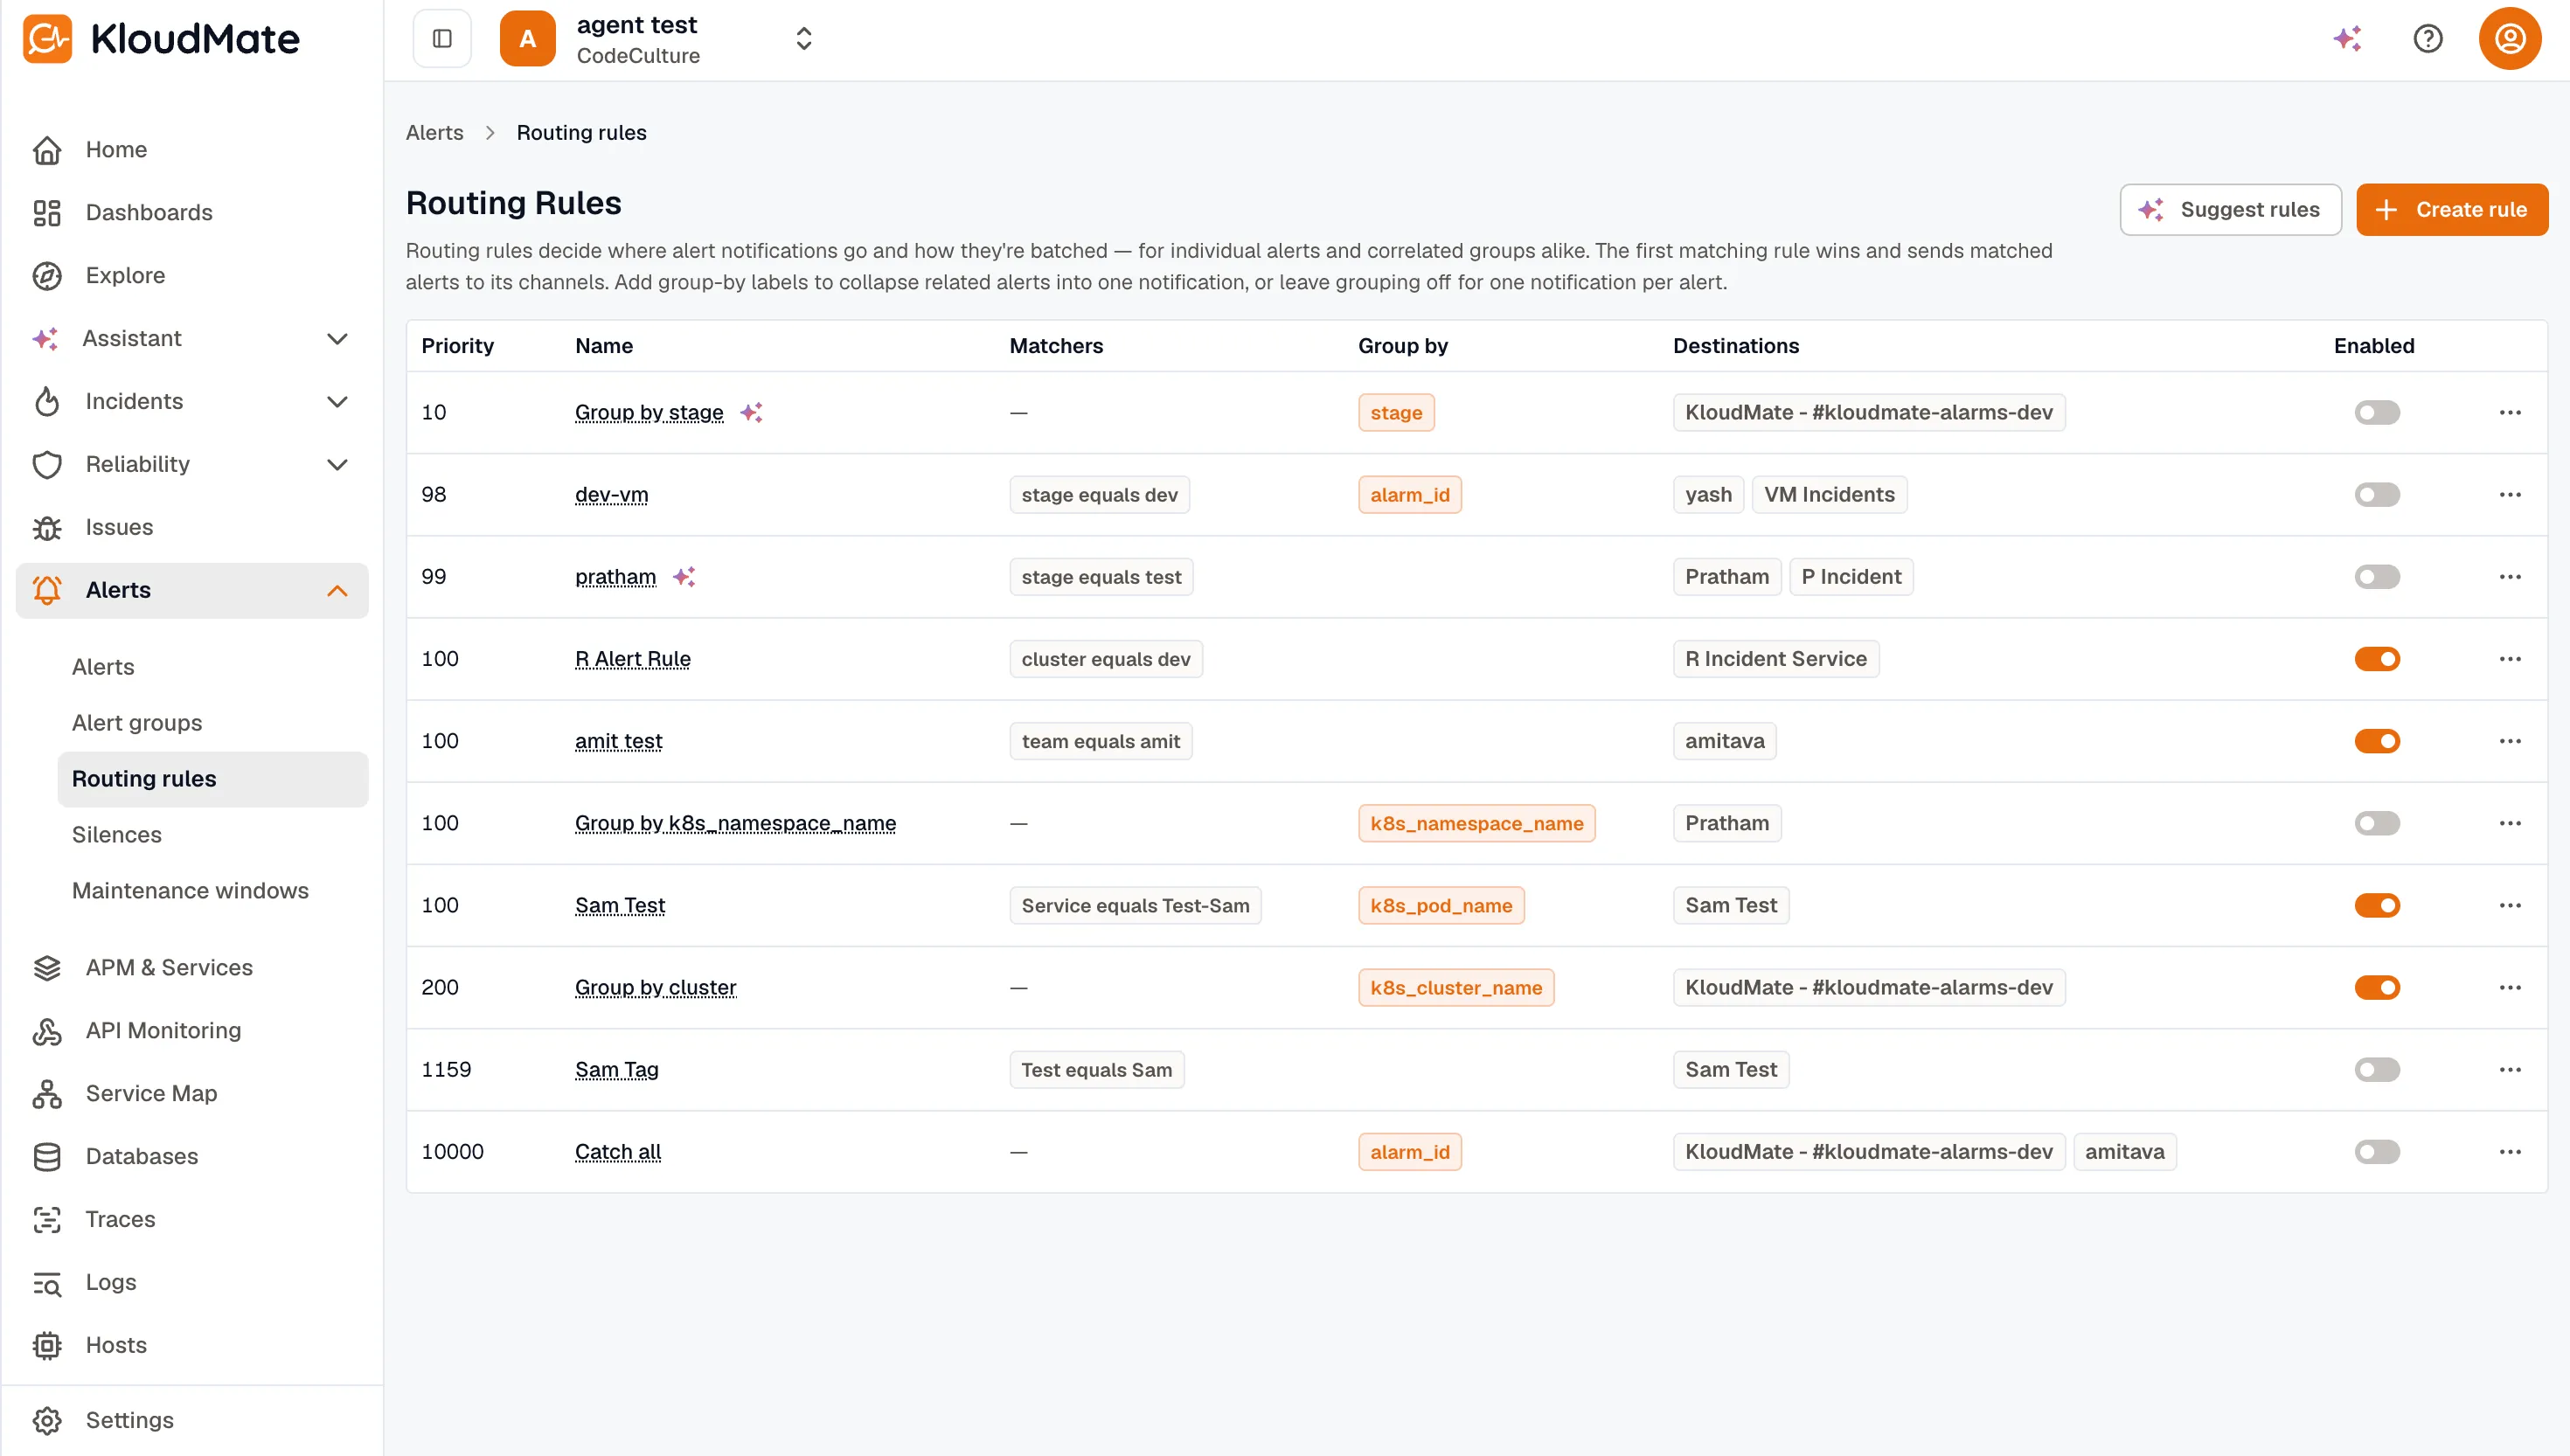
The list shows every routing rule in the workspace, sorted by priority (lower wins). The default passthrough rule sits at the bottom — it matches everything that didn’t already match a higher-priority rule and can’t be deleted.
Anatomy of a rule
Section titled “Anatomy of a rule”A routing rule has six parts:
| Field | What it does |
|---|---|
| Name | How the rule appears in the list and audit log. |
| Priority | Lower numbers win. When an alert matches multiple rules, the highest-priority (lowest-numbered) rule routes it. |
| Matchers | Label conditions that pick which alerts this rule applies to. |
| Group-by | Whether and how matched alerts correlate. Leave it empty (or set only alarm_id) for one notification per alarm rule — no grouping. Add a real label key (e.g. service) to correlate matching alerts that share that value into one Alert Group. severity can’t be used here. |
| Cadence | group_wait (how long to wait after the first signal before sending the first notification) and group_interval (how often to re-notify on an open group). |
| Destination channels | One or more notification channels that receive the dispatched payload. |
Optional:
- Auto-RCA — toggle to run KloudMate’s AI investigator on every group this rule opens. See Auto-RCA.
Matchers
Section titled “Matchers”Each matcher is one label condition — a label key, an operator, and a value. An alert has to satisfy every matcher you add (they combine with AND) before this rule handles it. Leave the list empty and the rule becomes a catch-all: it handles every alert no higher-priority rule already caught.
The available operators:
| Operator | Wire format | Meaning |
|---|---|---|
| Equals | equals | Label value matches the string exactly. |
| Not equals | not_equals | Label value differs from the string (also matches alerts that don’t carry the label at all). |
| Matches regex | matches_regex | Label value matches the regular expression. |
| Doesn’t match regex | not_matches_regex | Label value doesn’t match the regex (also matches alerts without the label). |
A matcher value is always a single string. To match any of several values, use a regex alternation — for example service Matches regex api|web matches either service. (There’s no in/not_in operator; the regex form replaces it.)
As you add or edit matchers, the editor shows a live Affected Alert Instances preview — the alert instances this rule currently matches, with a running match count — so you can confirm the rule’s scope before saving.
Group-by keys
Section titled “Group-by keys”Group-by decides whether matched alerts correlate and, if so, along which dimension:
- Leave it empty — or set only
alarm_id— and the rule doesn’t correlate anything: each alarm rule notifies on its own, one notification per rule. These notifications surface through the normal alerts UI, not the Alert Groups page. - Add a real label key and matching alerts that share that key’s value fold into a single alert group. The editor suggests common keys —
service,env,host,region,team,issue_id,check_id,alarm_rule_folder_id— and you can type any other label key.
Two constraints the editor enforces:
- If you add a real dimension alongside
alarm_id, thealarm_idis dropped automatically — pinning each group to a single alarm would defeat the correlation. severitycan’t be a grouping dimension. It’s a per-instance property fixed when the group opens, not an axis to group on.
You can combine keys (e.g. service + env) to scope each group tightly. Pick keys based on which dimension changes the most: aggressive grouping (only service) reduces notification noise but sacrifices precision in the group title.
Cadence
Section titled “Cadence”- group_wait — default
30s. The grouping engine holds the first notification for this long after a group opens, so closely related signals fold in before paging. - group_interval — default
5m. Once a group is open, KloudMate re-notifies at this cadence if new signals continue to arrive.
The default passthrough rule
Section titled “The default passthrough rule”Every workspace has a default passthrough rule pinned to the bottom of the list. It matches everything that didn’t match a higher-priority rule. You can edit its destination channels and cadence, but you can’t delete it or change its matchers.
If you want a clean “everything else goes to Slack” path, point the default passthrough at your fallback Slack channel.
Create a routing rule
Section titled “Create a routing rule”-
Open Alerts → Routing rules and click Create rule.
-
Name the rule and set its priority. Lower numbers win — give specific rules low numbers (10, 20, 30) and generic ones higher numbers. The default passthrough sits at priority 1,000,000 so unmatched alerts always have somewhere to land.
-
Add matchers. Pick a label key, an operator, and a value. Add as many rows as needed; all matchers are combined with AND.
-
Set group-by keys. Leave this empty to notify once per alarm rule, or add a real label key (start with
service) to correlate matching alerts into one group.severityisn’t allowed here. -
Tune cadence. Leave the defaults (
30swait,5minterval) for most cases. Tighten them for paging rules, or loosen them for digest-style summaries. -
Pick destination channels. Add one or more channels. If you don’t have a KloudMate Incidents channel yet, use the inline + Add KloudMate Incidents channel link in the picker.
-
Optionally enable Auto-RCA. Toggle Auto-RCA on and set the delay (default 5 minutes after group open). See Auto-RCA.
-
Save. The rule appears in the list at its assigned priority.
Row actions
Section titled “Row actions”The kebab menu on each row offers:
- Edit — opens the rule editor.
- Duplicate — opens the editor pre-filled with the rule’s settings under a “(copy)” name so you can adjust matchers or priority and save as a new rule.
- Delete — removes the rule. The delete is blocked while open alert groups still route through this rule — resolve or re-route those groups first, then delete. The default passthrough rule can’t be deleted at all.
The Enabled toggle in each row disables the rule without deleting it — useful for staging a rule before enabling it.
Suggest rules
Section titled “Suggest rules”The list header has a Suggest rules button (visible to admins only). Clicking it opens a drawer with up to five AI-suggested rules based on your workspace’s recent alert traffic.
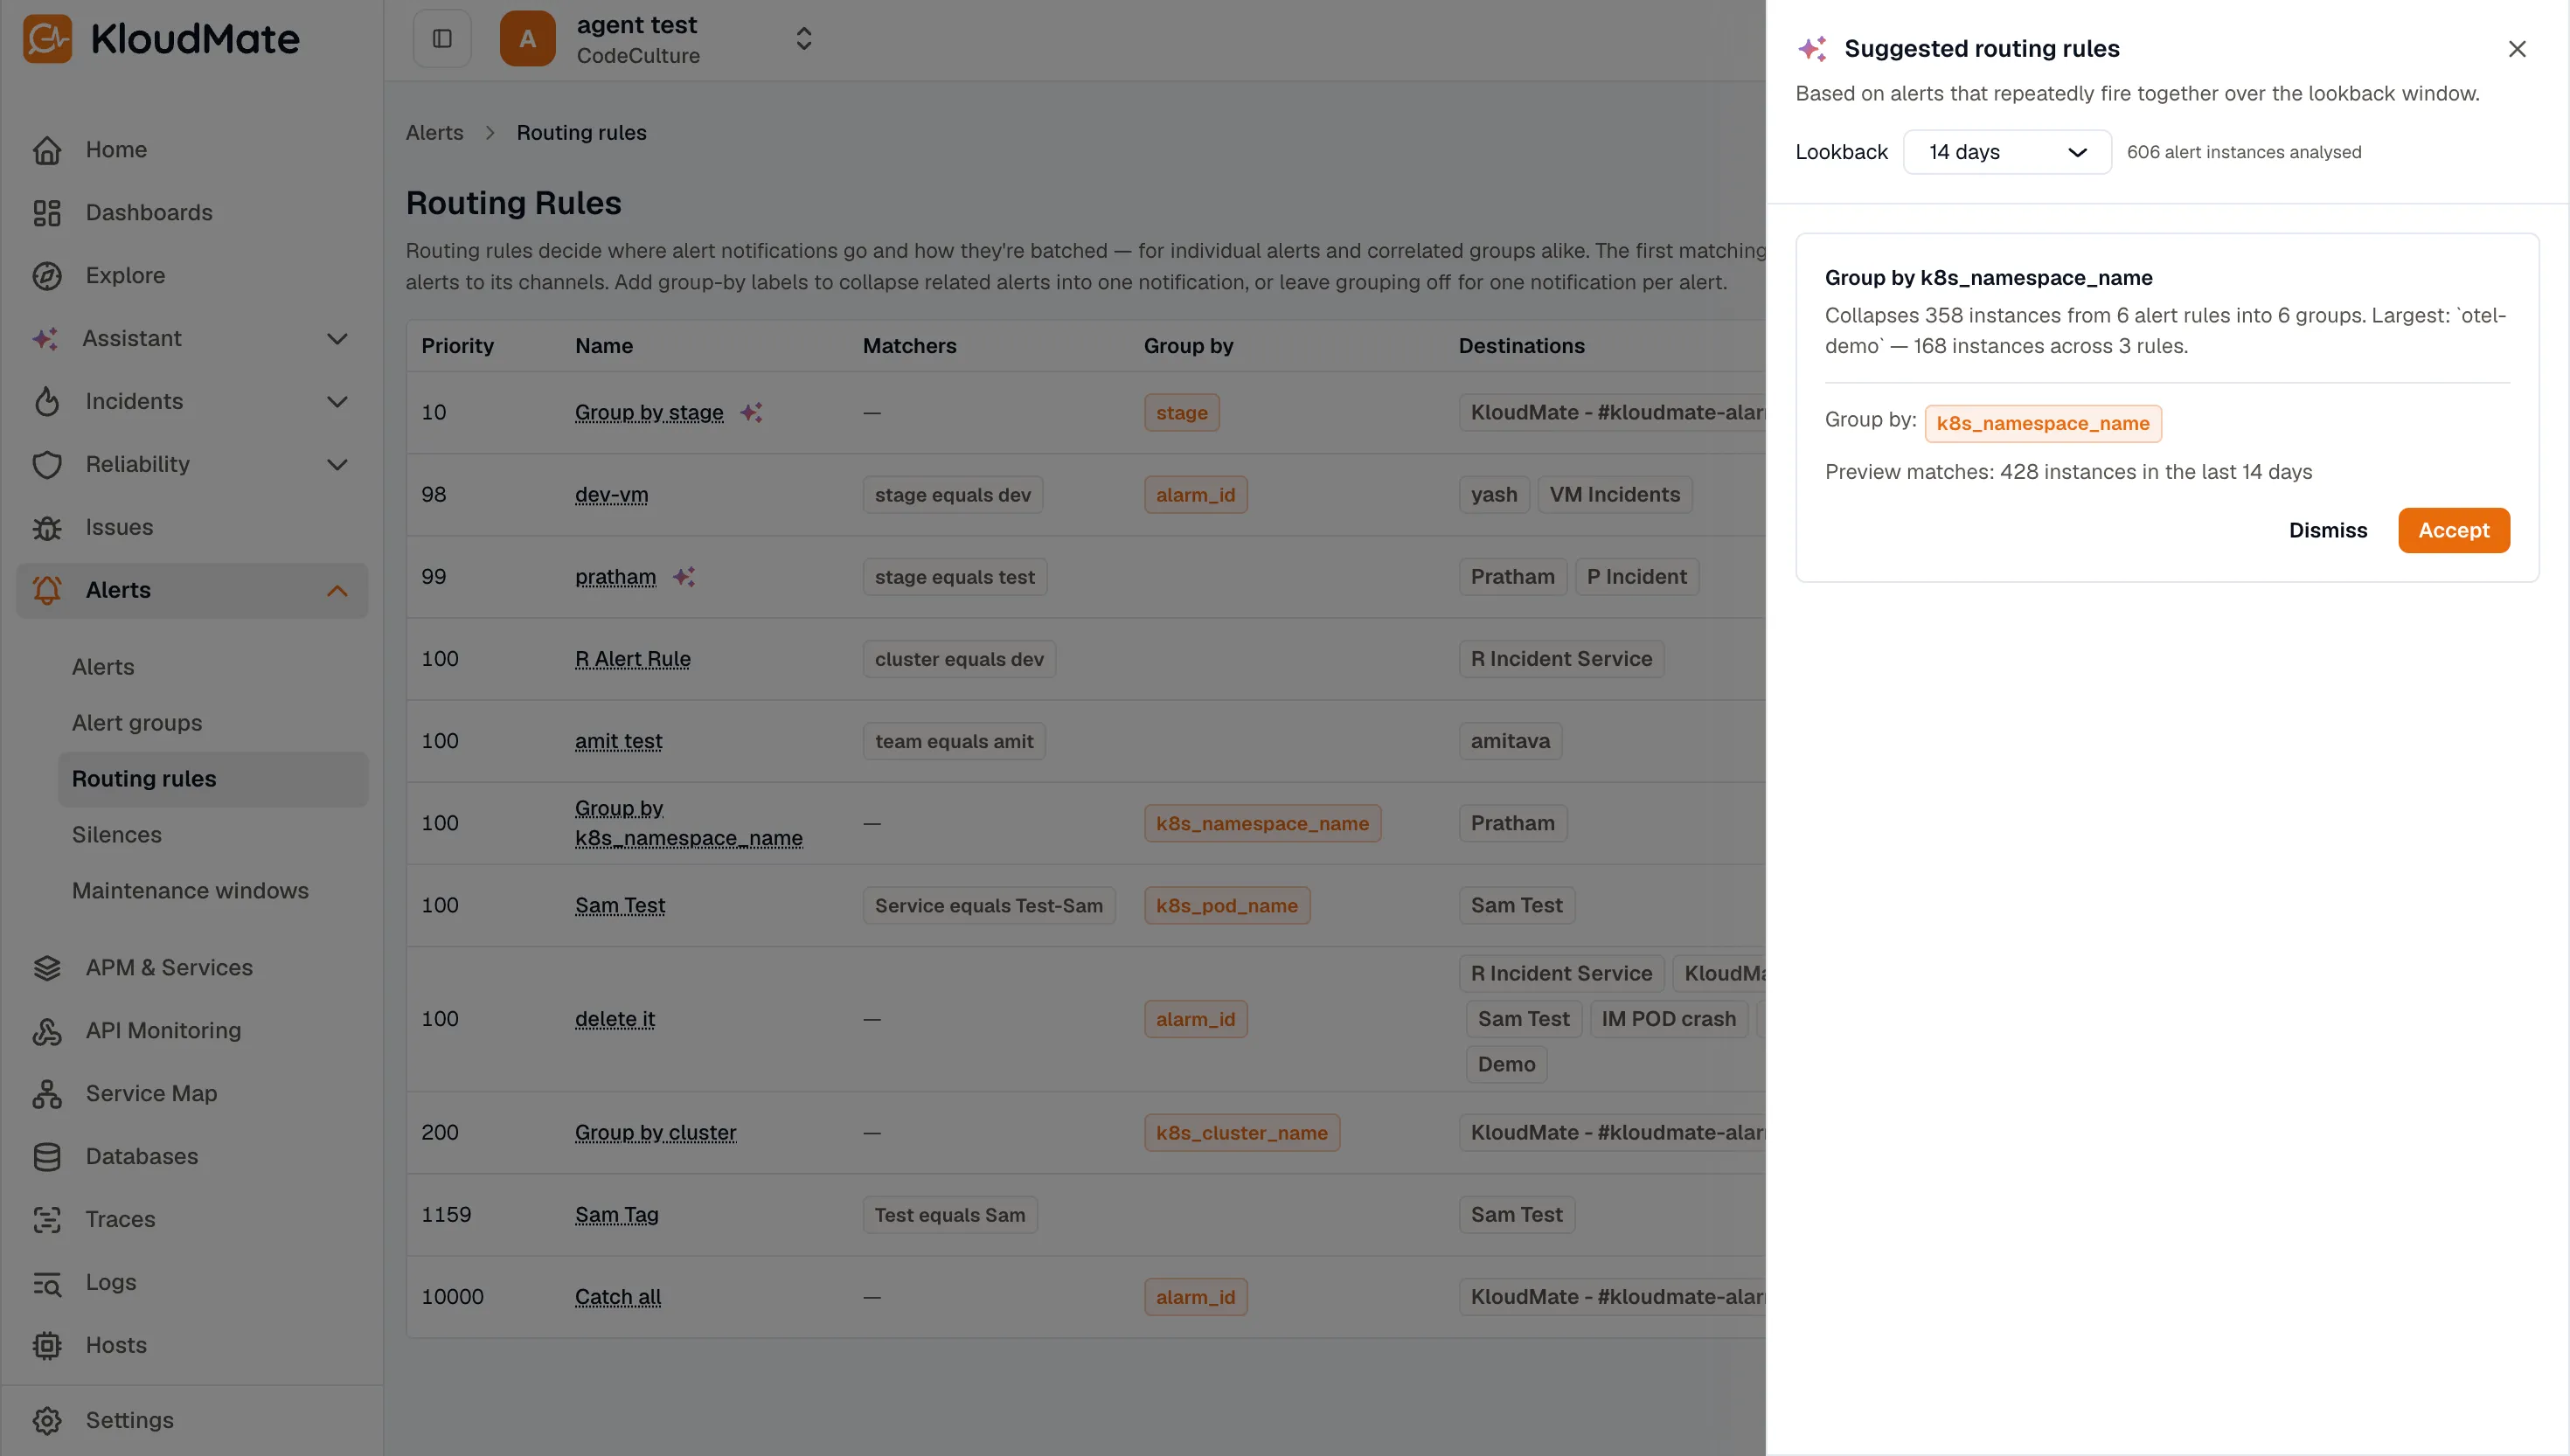
Each suggestion shows:
- A title describing the proposed grouping (e.g. “Group by service + env”).
- A short rationale — how much notification noise the rule would have collapsed over the lookback window.
- A preview matches count for that window.
- Accept opens the create-rule form pre-filled with the suggestion’s matchers, group-by keys, and cadence, under a name derived from what the rule targets. Dismiss drops the card.
Some suggestions are grouping-only: they propose group-by keys with no matchers. Accepting one starts the rule as a catch-all that groups everything by those keys — add matchers before saving if you want to scope it to a subset of alerts.
Suggestions don’t persist — closing the drawer discards them. Re-run the suggester whenever you want fresh proposals.
Related
Section titled “Related”- Alert Groups — what routing rules produce.
- Silences — temporarily suppress matching alerts.
- Notification Channels — set up Slack, KloudMate Incidents, email, and more.
- Auto-RCA — automatic investigations on group open.