

Notification Channels
To receive notifications from KloudMate, you need to set up notification channels — the communication platforms where alerts and incident updates are sent.
KloudMate supports the following notification channels:
- Slack
- SNS
- MS Teams
- Webhook
- Jira
- KloudMate Incidents — bridges alerts and synthetic checks into Incident Management
A Slack or Jira channel can reuse an account you’ve already connected instead of asking for its own credential. The channel form lists the connections that can be used for Notifications, and lets you connect a new one without leaving the form. When the credential changes, you then rotate it in one place.
In the case of multiple workspaces and AWS accounts, you must set up notifications for each account in their respective Settings.
Navigate to Settings > Notification Channels. The screen displays all existing channels with their name, type, and address. A channel whose last delivery failed is marked Error, with the reason and the time it happened shown under its address.
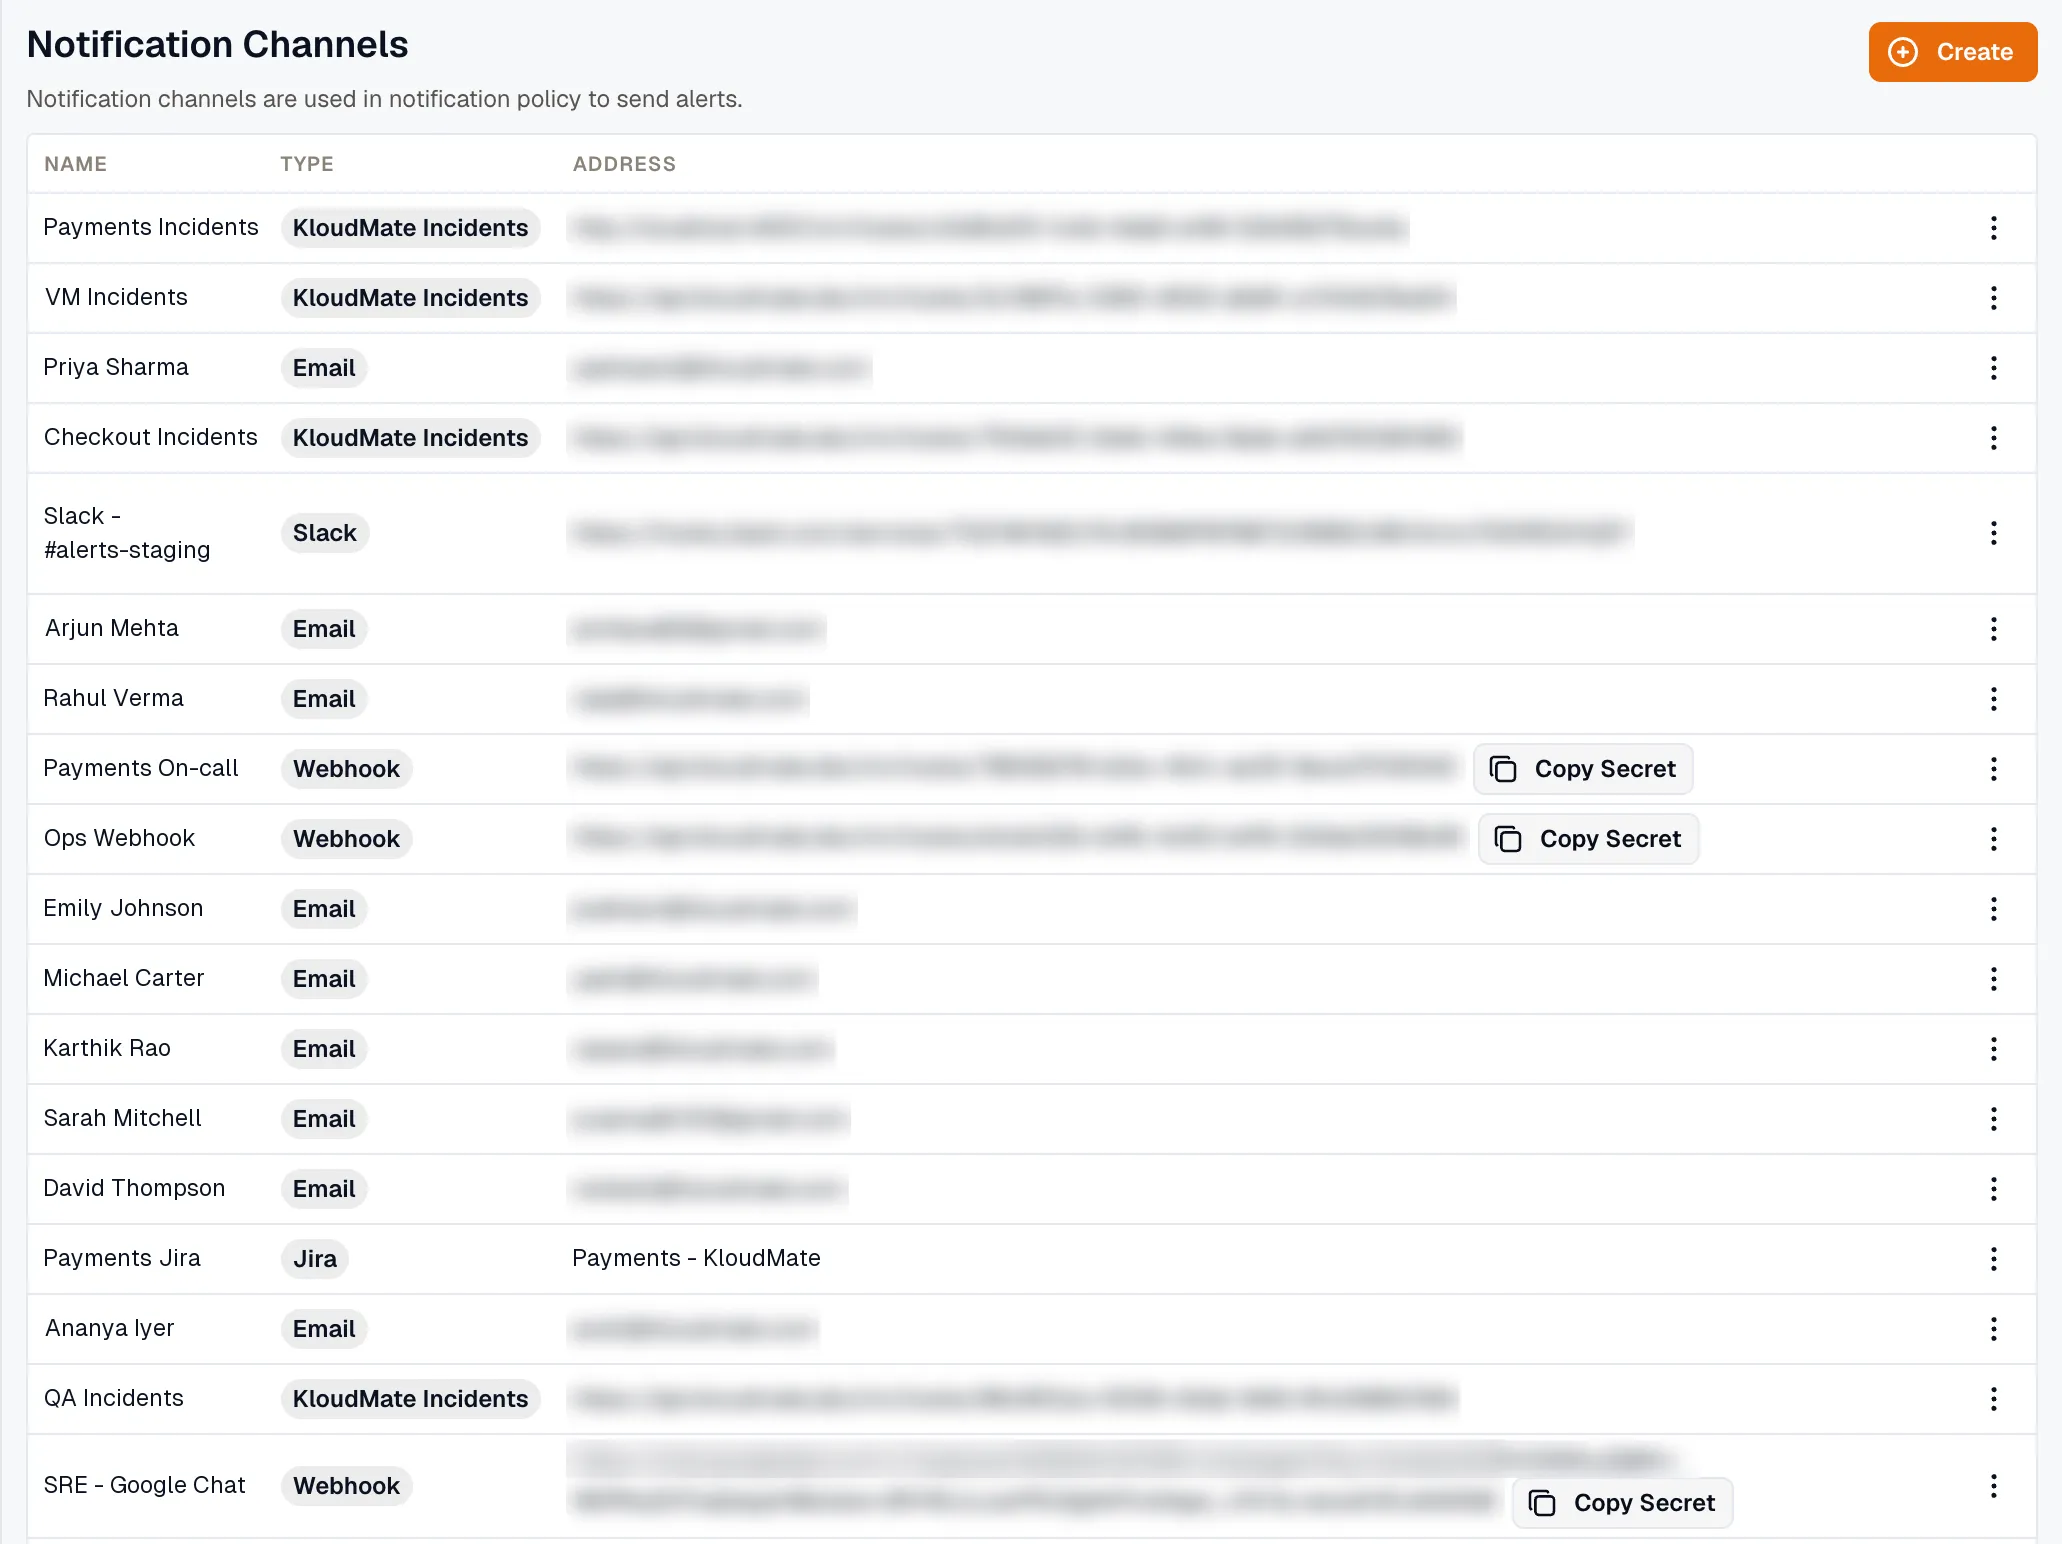
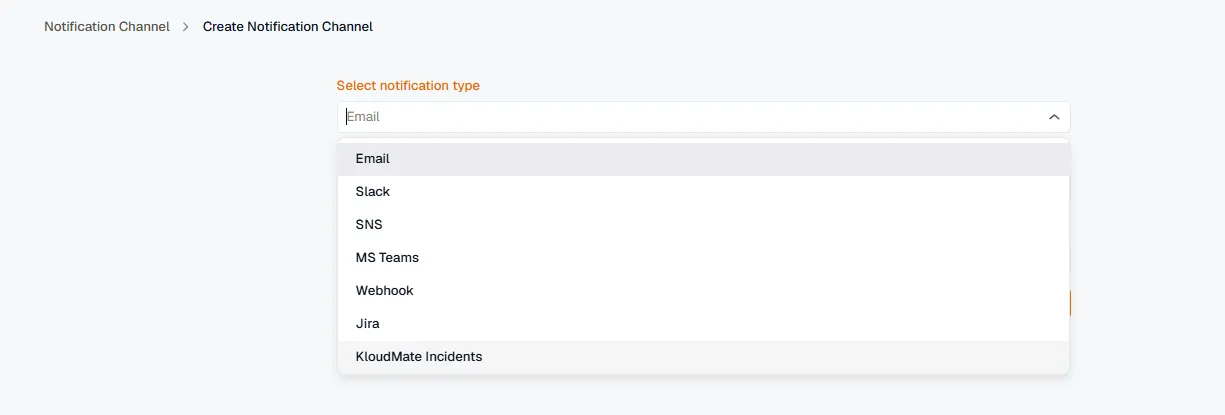
- Click the Create button at the top-right corner.
- Select the desired channel type from the dropdown.
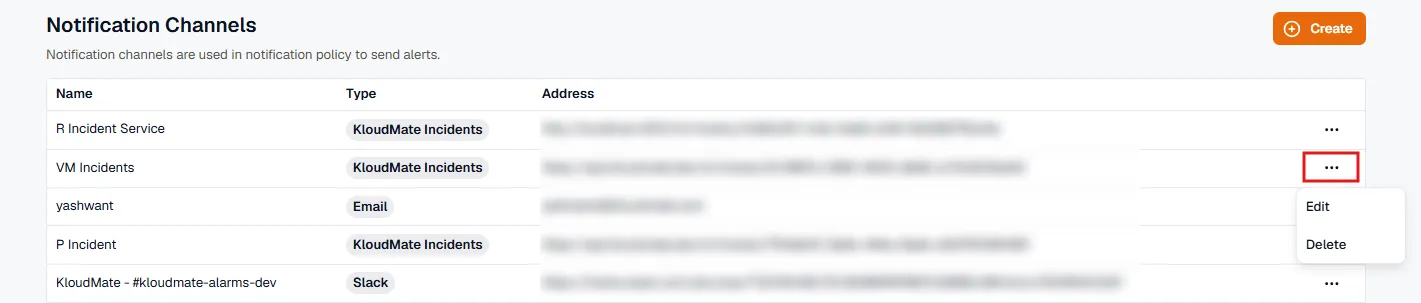
Once created, the channel appears in the list. You can Edit or Delete any channel using the more options (⋯) icon.
Below are the configuration steps for each specific channel type:
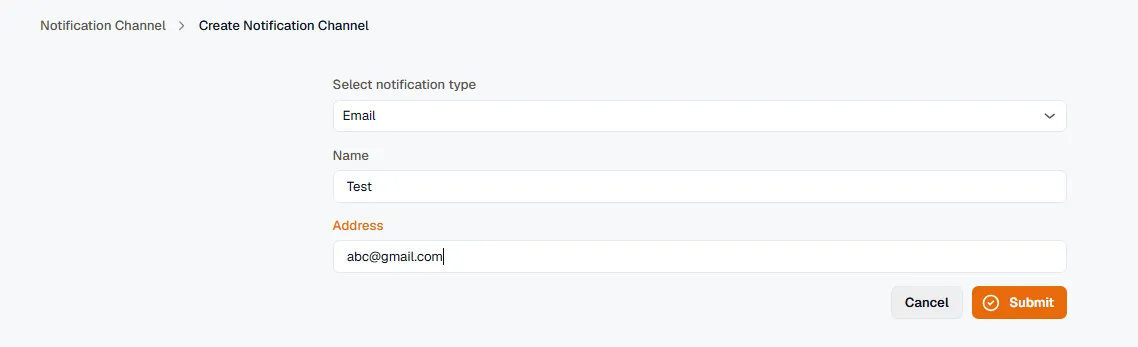
- Select Email from the dropdown menu.
- Enter a Name for the channel (e.g., demo) and your email address in the Address field.
- Click Submit.
KloudMate uses a single unified Slack app for both notifications and IM ChatOps. Installing it once gives you threaded notifications, message attribution, and the ability to acknowledge or resolve incidents directly from Slack.
- Select Slack from the dropdown menu.
- Pick a connected Slack account. If none is connected yet, click Connect Slack and approve the install in the popup that opens.
- Enter a Channel name for the KloudMate side, then pick the Slack channel to post into. The list searches your Slack workspace’s public and private channels through the connected bot, so type to narrow it.
- Click Create channel.
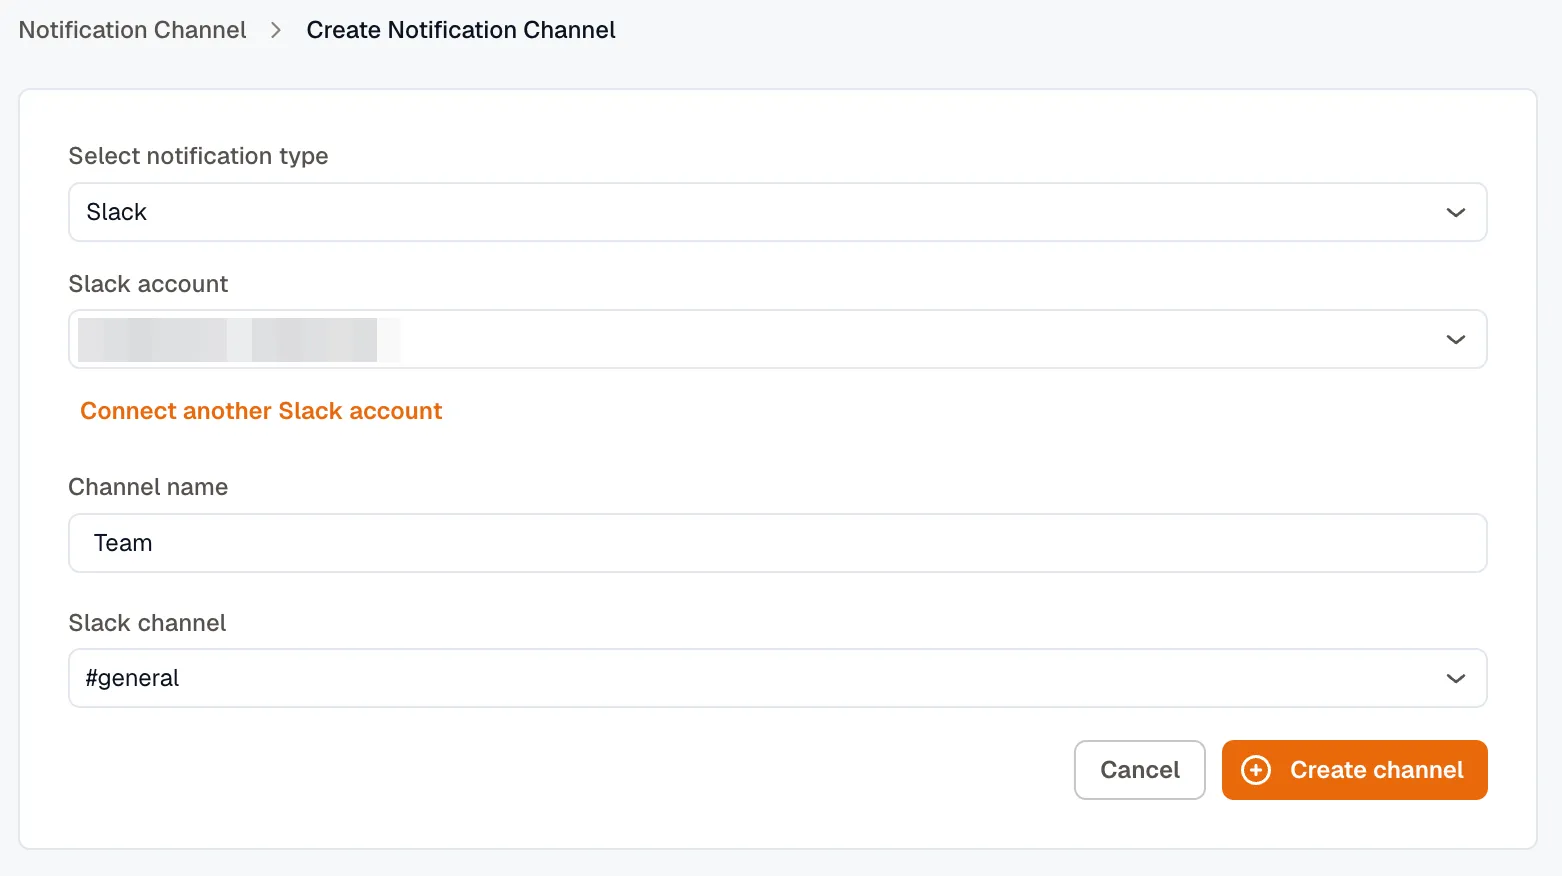
The same Slack install appears under Settings → Connections and under Incidents → Chat Ops. Connect it once and reuse it for every Slack channel you create here.
MS Teams
Section titled “MS Teams”- Select MS Teams from the dropdown menu.
- Create an incoming webhook URL from Microsoft Teams by going to Channel > Connectors > Incoming Webhooks in the Microsoft Teams Apps.
- Enter the Team Channel Name and the Webhook Address in their respective fields.
- Click Submit.
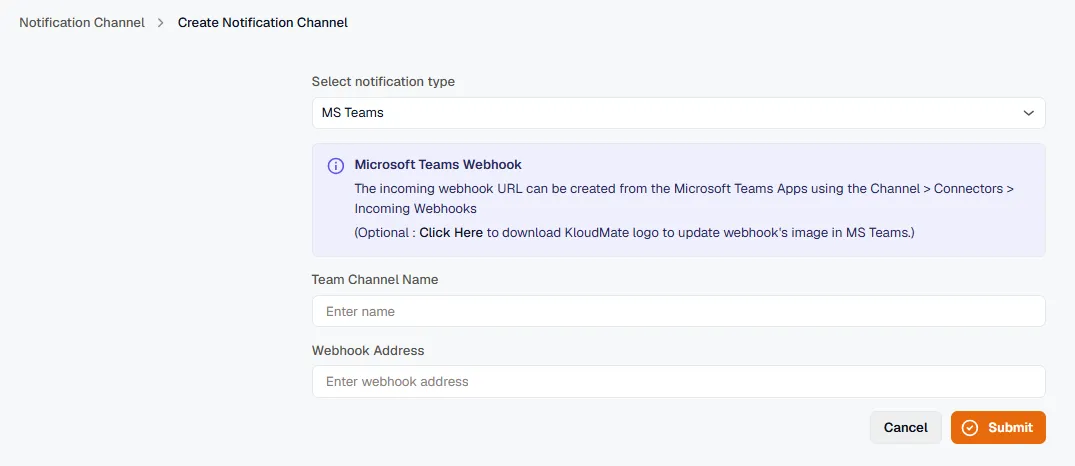
Optionally, you can download the KloudMate logo from the link provided on the screen to update the webhook’s image in MS Teams.
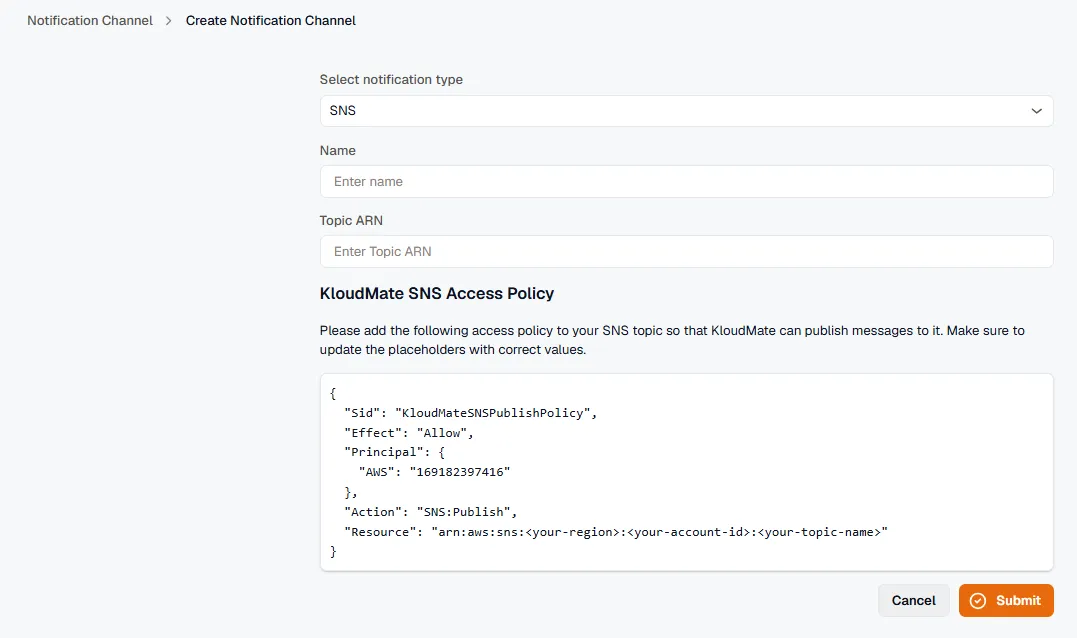
- Select SNS from the dropdown menu.
- Copy the KloudMate SNS Access Policy displayed on the screen. Navigate to your AWS Console and paste the policy into your SNS topic. Update the placeholders in the policy with the correct values.
- Return to KloudMate, enter a Name and your Topic ARN in their respective fields.
- Click Submit.
Webhooks
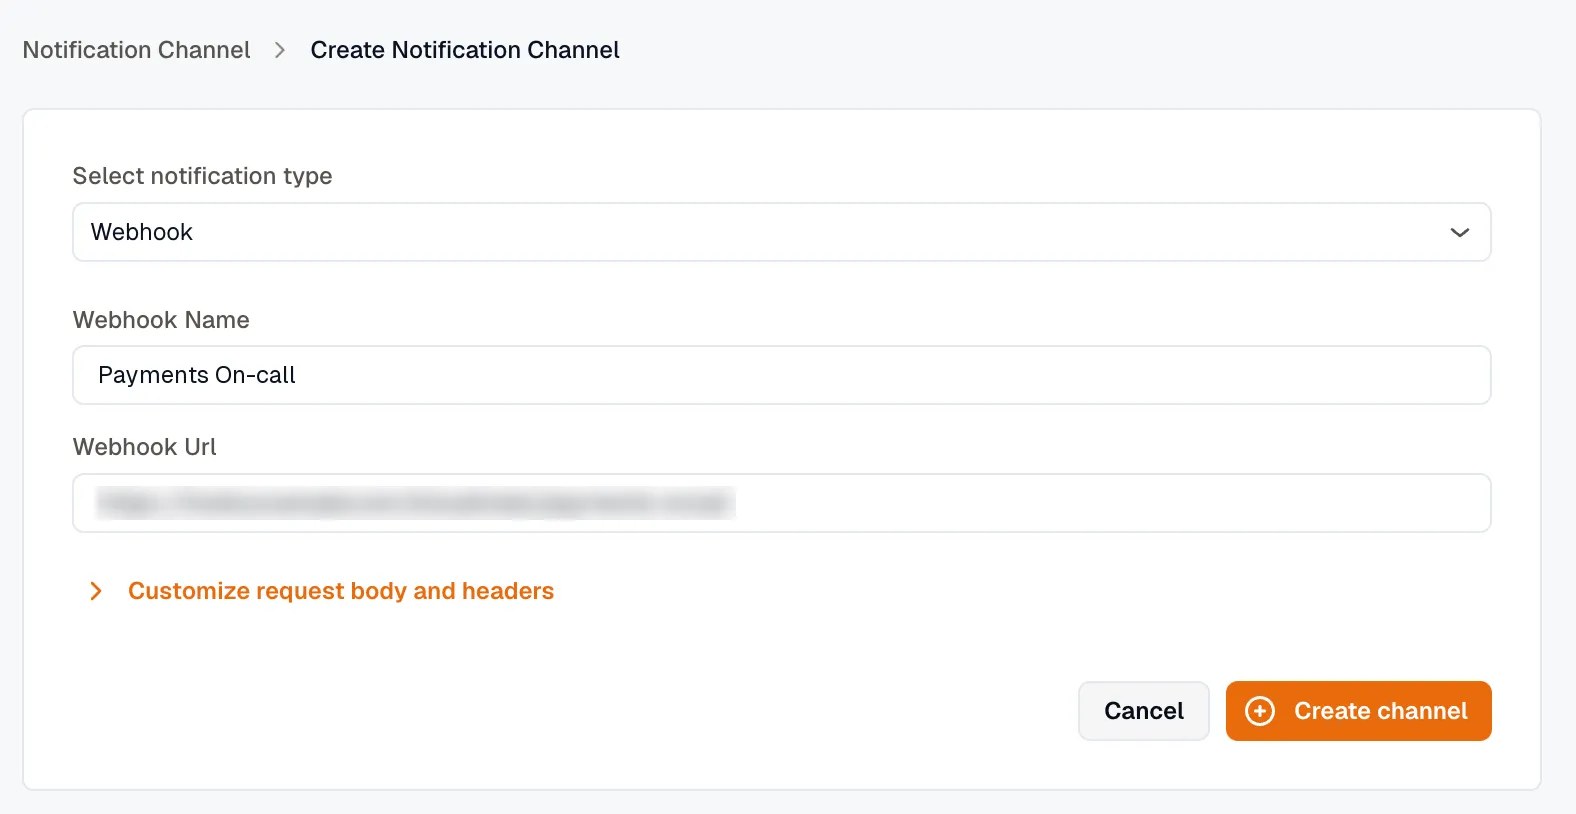
Section titled “Webhooks”- Select Webhook from the dropdown menu.
- Enter a Webhook Name and the Webhook Url in their respective fields.
- Click Create channel.
KloudMate generates a secret for the channel and uses it to sign every request with an HMAC-SHA256 signature, so you can verify that a request came from KloudMate. With the Developer role, you can copy the secret from the channel list with Copy Secret.
A webhook channel also sends alerts to a workflow. Set the channel’s URL to the workflow’s webhook URL, then add the channel to a routing rule. Each notification then starts a run, with the alert group payload as the request body. See Triggers.
Customize the Request Body and Headers
Section titled “Customize the Request Body and Headers”By default, a webhook sends KloudMate’s standard JSON payload, which some receivers reject. Google Chat, for example, accepts only a message object like {"text": "..."}, with its auth token in the webhook URL, so no header or secret is needed. The same {"text": ...} body also works for Slack incoming webhooks and Microsoft Teams. A webhook channel can rewrite its outgoing body and add headers to match.
In the webhook channel editor, click Customize request body and headers to expand the options.
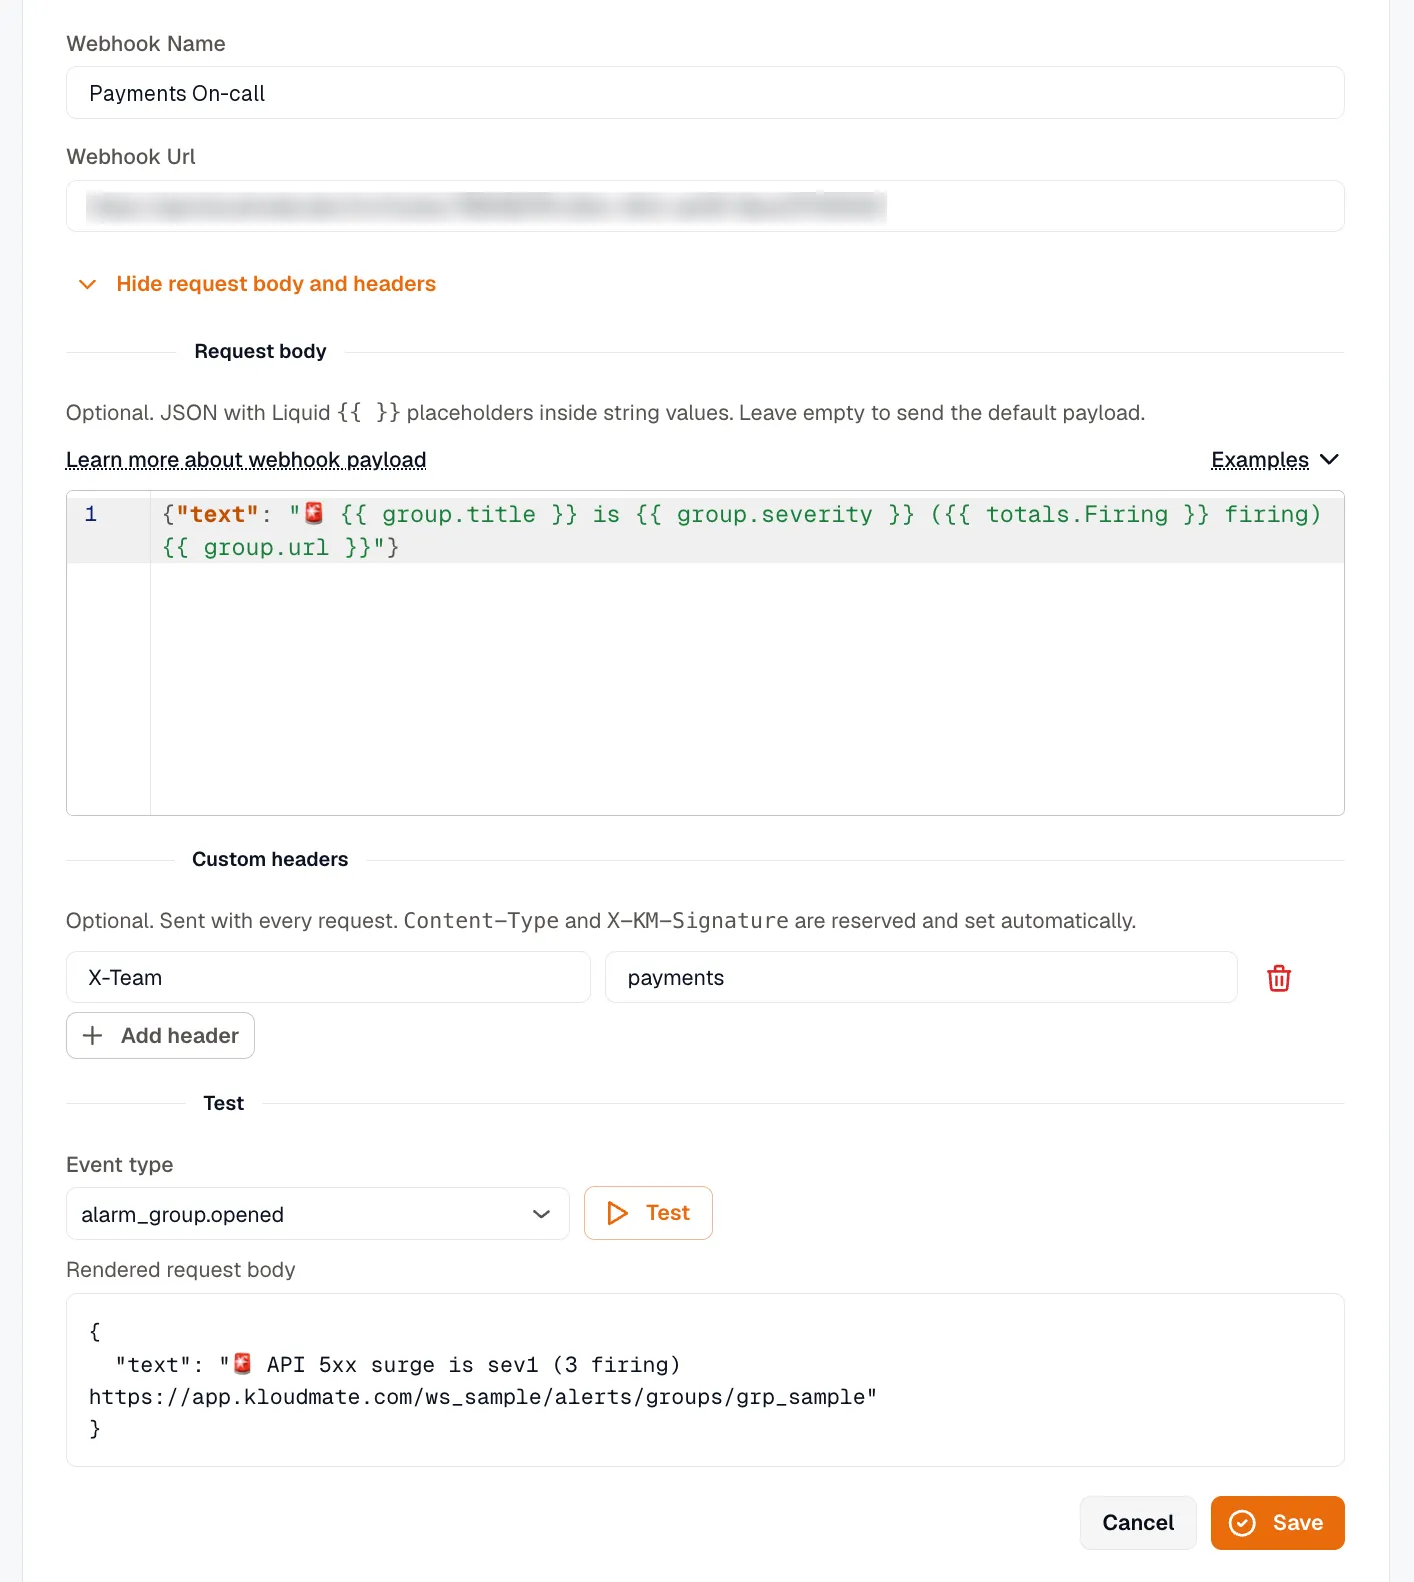
Request body takes JSON with Liquid {{ }} placeholders inside string values, filled from the event. Leave it empty to send the default payload. The Examples menu fills it with a starter template, and Notification Payloads lists the fields each event type exposes.
Custom headers are key/value pairs sent with every request. Content-Type and X-KM-Signature are reserved and set automatically.
Test previews the rendered body against a sample event. The Event type list picks which event to sample.
Saving runs the same check as Test, so a channel with invalid JSON, invalid Liquid, or a reserved header won’t save. If a custom body still fails to render when a notification goes out, the channel is marked Error and that delivery isn’t retried.
Webhook Signature Validation
Section titled “Webhook Signature Validation”When KloudMate sends a webhook to your configured URL, it includes an X-KM-Signature HTTP header. This signature is an HMAC-SHA256 hash generated using the payload body and the channel’s secret.
To ensure the webhook is genuinely from KloudMate, you should compute the hash on your server and compare it with the X-KM-Signature header.
Here are examples of how to perform this validation in common programming languages:
Notification Payloads
Section titled “Notification Payloads”Every webhook is a single POST with a JSON body and Content-Type: application/json. Without a custom request body, this is what KloudMate sends, and a template reads its fields from the same payload. Receivers that verify the signature should hash the raw body before parsing it.
Each notification has an event type. The Event type picker in the channel editor lists all of them, and a template can reference any field from the matching payload.
| Event type | Payload |
|---|---|
alarm_group.opened | Alert group, event is opened |
alarm_group.appended | Alert group, event is appended |
alarm_group.repeat | Alert group, event is repeat |
alarm_group.resolved | Alert group, event is resolved |
alarm_group.rca_completed | Alert group, event is rca_completed |
issue.created | New issue |
slo.burn_rate.firing | SLO burn rate |
slo.burn_rate.resolved | SLO burn rate |
synthetics.incident.created | Synthetic monitor |
synthetics.incident.resolved | Synthetic monitor |
investigation.completed | AI investigation |
The alarm group payload sets a top-level event field to the lifecycle stage. The other payloads carry no event field. A receiver tells them apart by their distinctive top-level keys: slo_name for SLO burn rate, monitor_id for a synthetic monitor, serviceName for a new issue, and investigationId for an AI investigation.
The tabs below show one representative example of each payload, the fields most useful in a template, and notes on how the variants differ.
Event types: alarm_group.opened, alarm_group.appended, alarm_group.repeat, alarm_group.resolved, alarm_group.rca_completed. Fields for templates: group.title, group.severity, group.state, group.url, group.opened_at, totals.Firing, rca.summary, rules[0].alarm_name, rules[0].instances[0].labels.<key>.
Sent when an alert group opens, appends new alerts, repeats while it stays open, resolves, or completes a root-cause analysis. The event field names which one. workspace identifies the workspace (tenant) the alert belongs to. group carries the group’s id, title, state, severity, labels, annotations, and its link in KloudMate. rules lists each alarm rule in the group; each rule’s instances array holds every matched instance with its own labels, annotations, and state, and commonLabels/commonAnnotations are the values shared by all of them. totals and each rule’s counts are keyed by state: Firing, Resolved, No Data, Error, Normal. group.mode is "group" for a correlated group or "standalone" for a single alarm rule.
Variants by event:
opened— the group’s first notification.stateis"Open";resolved_atandrcaarenull.appended— new activity on an open group. Each instance shows its currentstate.repeat— a reminder that the group is still open, sent on the cadence set by the routing rule’s Repeat interval. The body is identical to anappended: the sametotals, the samerules. Only theeventfield tells them apart.resolved— the group has cleared.stateis"Resolved",resolved_atis set, and instances show their final state (Resolved,Normal,No Data, orError).rca_completed— a root-cause investigation finished. The group’s state does not change;rcais filled in instead ofnull:
Event type: issue.created. Fields for templates: subject, serviceName, severity, errorMessage, occurrence, lastOccurrenceAt, actionUrl, and actionLabel.
Sent when a new issue is created for a service.
Event types: slo.burn_rate.firing, slo.burn_rate.resolved. Fields for templates: subject, slo_name, severity_tier, threshold, short_window, long_window, observed_short_burn, observed_long_burn, status_line, and actionUrl.
Sent when an SLO burn-rate alert starts firing or resolves. threshold and the observed burn rates are formatted with a trailing × (an infinite rate renders as ∞); windows render as 5m, 1h, etc.
On resolve, subject becomes "✅ SLO burn-rate resolved: Checkout availability" and status_line becomes a duration, e.g. "Fired for 17 minutes". severity_tier is one of critical, high, medium, or low.
Event types: synthetics.incident.created, synthetics.incident.resolved. Fields for templates: subject, name, target, cause, start_time, duration, monitor_id, actionUrl, and actionLabel.
Sent when a synthetic monitor goes down or recovers.
On recovery, subject becomes "🟢 Monitor is UP: API health", duration is populated (e.g. "15 minutes"), and an end_time field is added.
Event type: investigation.completed. Fields for templates: subject, title, rootCauseAnalysisText, completedAt, actionUrl, and actionLabel.
Sent when an AI investigation completes. rootCauseAnalysisText is plain text, truncated to 8000 characters.
KloudMate Incidents
Section titled “KloudMate Incidents”KloudMate Incidents is the channel type that bridges into Incident Management. When an alert routes through a KloudMate Incidents channel, KloudMate opens an incident on the linked IM service automatically — no separate webhook plumbing required.
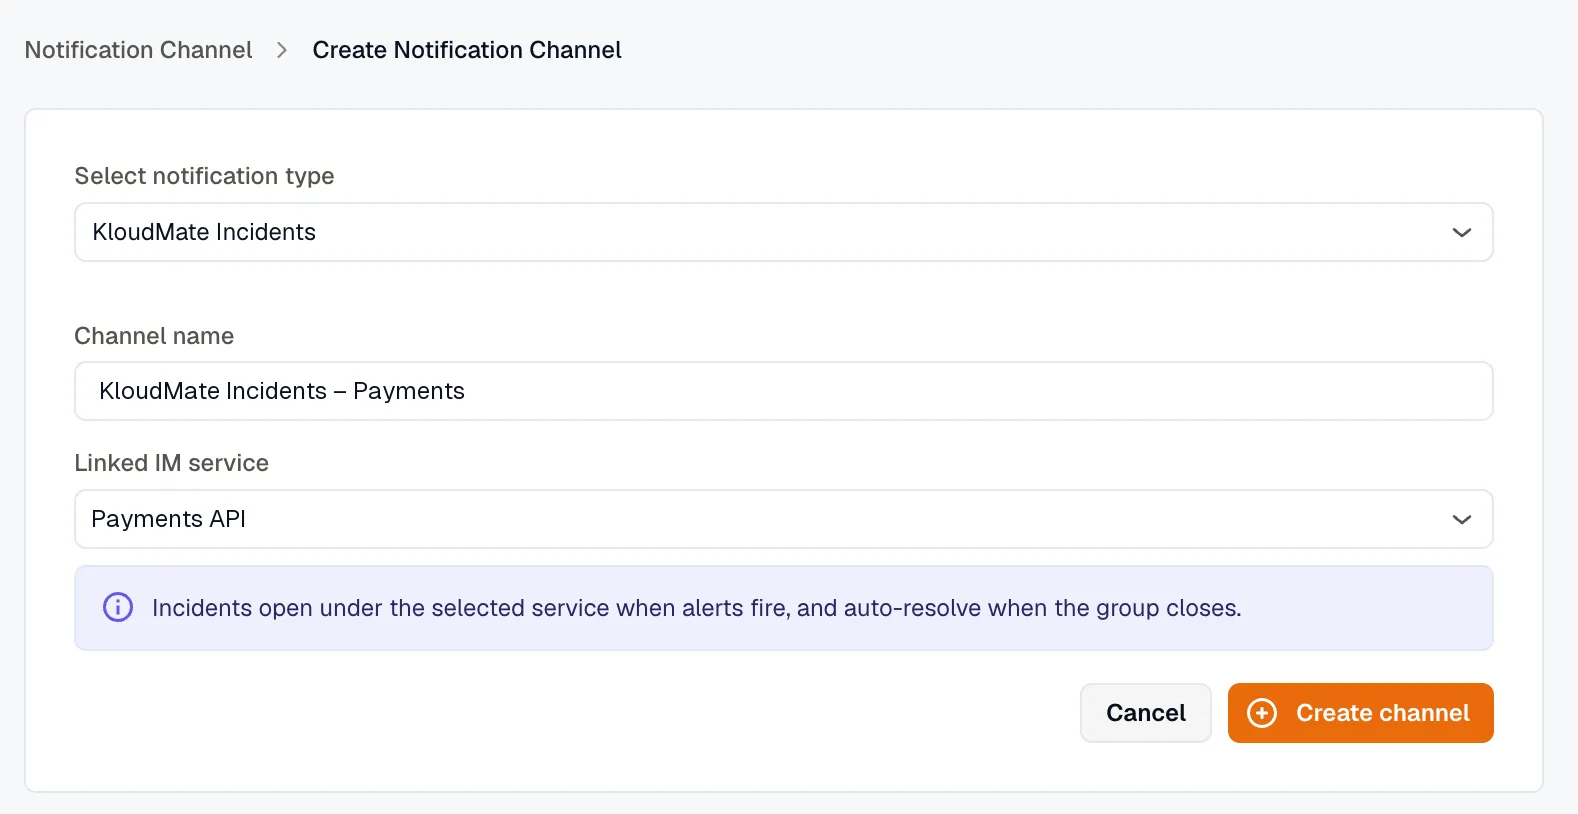
- Select KloudMate Incidents from the dropdown menu.
- Enter a Channel name, such as
KloudMate Incidents – Payments. - Pick the IM service you want to bridge into from the Linked IM service dropdown. If you don’t have any services yet, KloudMate prompts you to create one first.
- Click Create channel.
KloudMate automatically creates two rows:
- A KloudMate Alert integration under the linked service.
- A notification channel pointing at the integration’s signed loop URL.
KloudMate Incidents channels are HMAC-signed by default — the signing secret is generated and stored automatically; you don’t need to copy or paste it. The signing secret and linked service are fixed at creation; to change either, delete the channel and create a new one.
To wire it into the alert flow, add the channel as a destination on a Routing Rule.
-
Select Jira from the dropdown menu, then pick a connected Jira account. If none is connected yet, click Connect Jira.
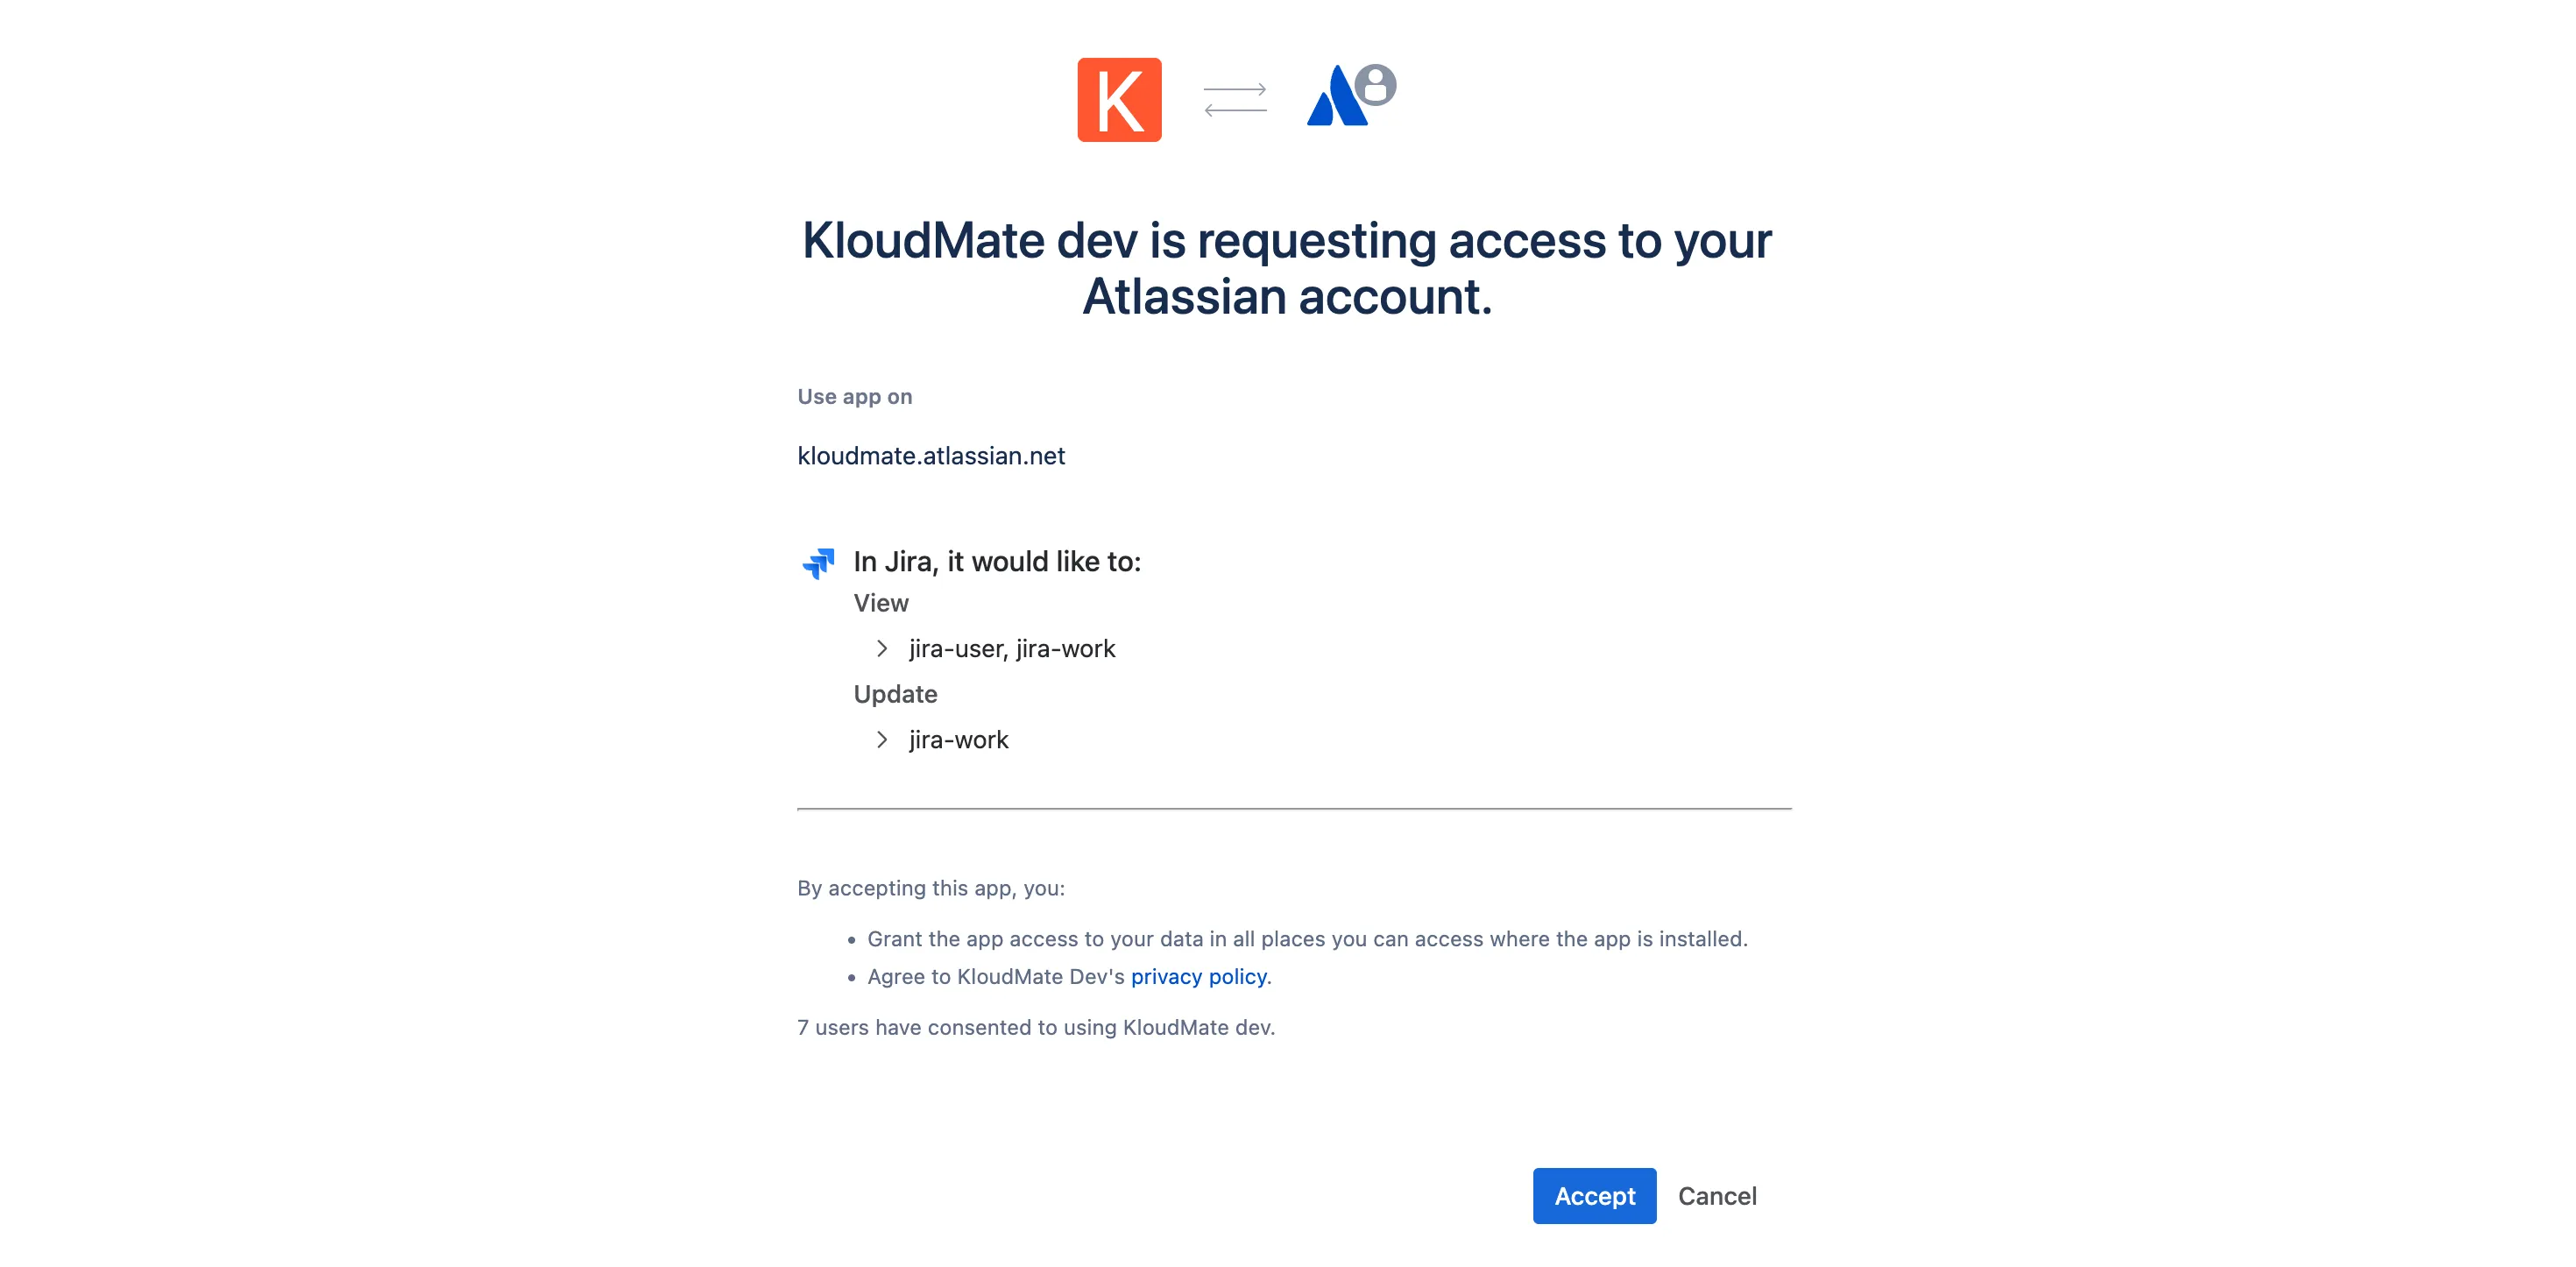
-
Approve access in the popup that opens.
- Back on the channel form, enter a Channel name and fill in the rest:
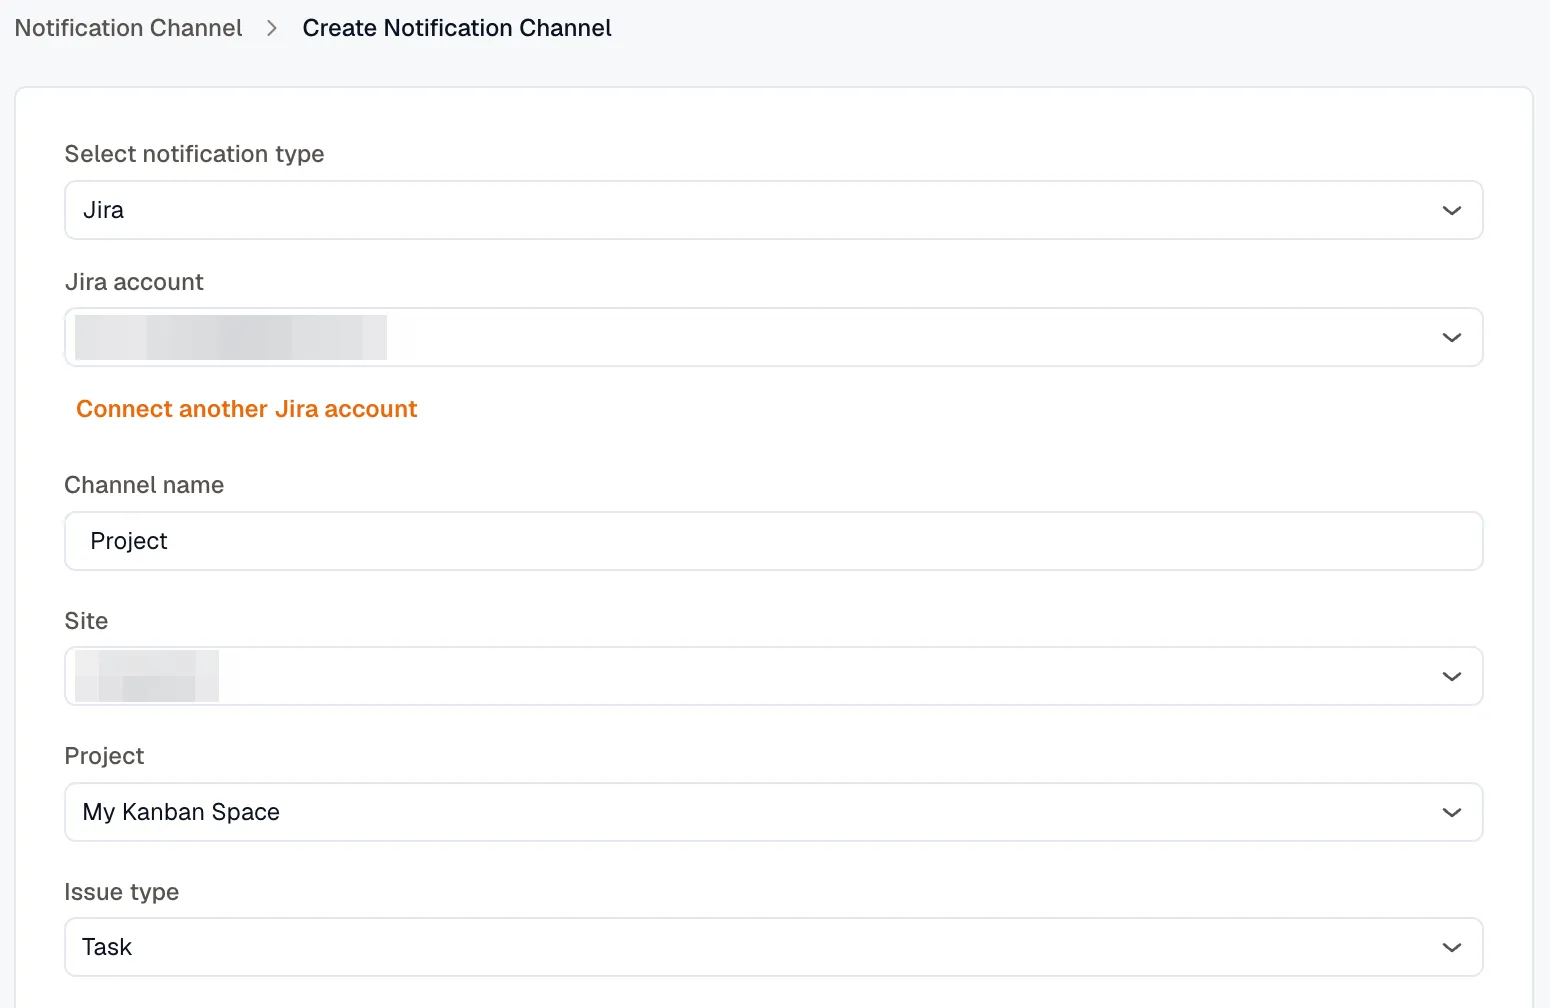
- Site: your Jira site
- Project: the Jira project to link
- Issue type: the type of issue to create, for example Task
- Status that maps to Open: the Jira status for an open ticket, for example To Do
- Status that maps to Closed: the Jira status for a closed ticket, for example Done
Each list loads from the one above it, so changing the site clears the project, and changing the project clears the three below it.
- Click Create channel.
If the Jira authorization has expired, the form says so and offers Reconnect Jira.
The Jira integration is one-way. Status changes in KloudMate are reflected in Jira, but changes made in Jira are not reflected in KloudMate.
Alert and Issue Details in Jira
Section titled “Alert and Issue Details in Jira”Alert details in Jira
| KloudMate | Jira |
|---|---|
| Alert name | Ticket title |
| KloudMate account name | Ticket title |
| Alert description | Ticket description |
| Alert value | Ticket description |
| Regression alerts | Ticket comment |
Issues details in Jira
| KloudMate | Jira |
|---|---|
| Issue’s service name | Ticket title |
| KloudMate account name | Ticket title |
| Regression Issues | Ticket title |
| Issue name | Ticket description |
| Issue comments | Ticket comments |
Creating a Manual Jira Ticket
Section titled “Creating a Manual Jira Ticket”You can create a Jira ticket directly from an issue or alert details page to raise individual tickets that are not bound to a routing rule.
Prerequisite: A Jira notification channel must already be configured.
- Navigate to the Issue or Alert details page.
- Click the Create in Jira button. A dialog opens showing all Jira channels integrated with your KloudMate account, along with any previously linked Jira tickets for that issue.
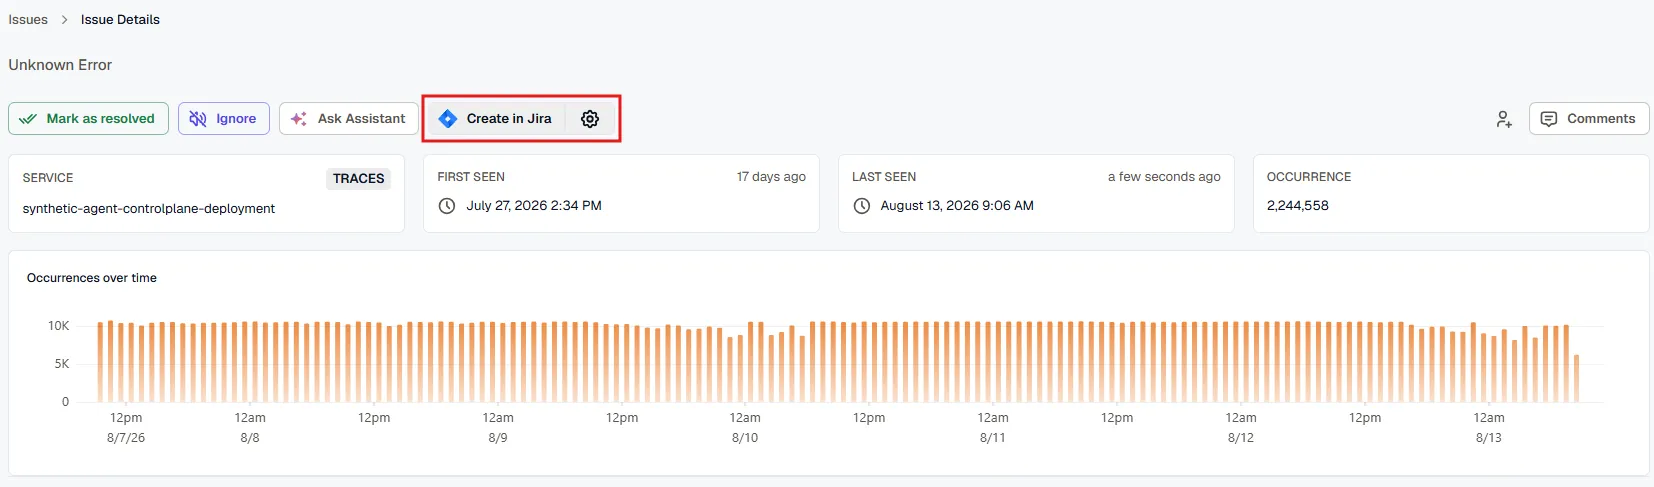
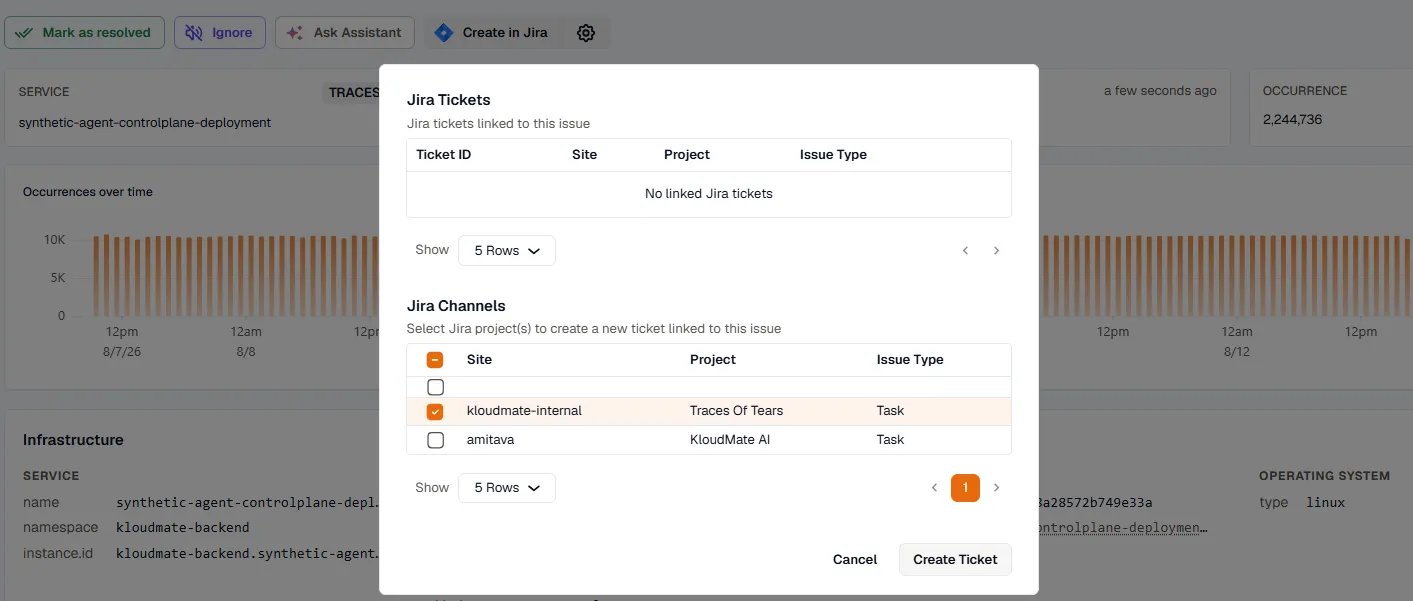
- Under Jira Channels, select the checkbox(es) for the channel(s) you want to raise a ticket in.
- Click Create Ticket.
Unlinking a Jira Ticket
Section titled “Unlinking a Jira Ticket”- On the issue or alert details page, click the settings icon next to the Create in Jira button to open the Jira Tickets panel.
- The panel displays all Jira tickets currently linked to the issue, showing the Ticket ID, Site, Project, and Issue Type.
- Click the unlink icon next to the ticket you want to remove to unlink it from KloudMate.
